
Disclaimer
There are no penalties for not following this guide. The information on this page is offered as optional guidance only. Photographers using the platform are independent businesses who control their own methods, style, and workflow. This material is for reference and learning purposes, not mandatory instruction.
Tip 1- Take a 5 to 10 minutes walk-through to make sure the house ready
-
Make sure the driveway and the front of the house are clear of cars
-
Make sure all lights are on
-
Make sure all window coverings, blinds, shutters, curtains, etc... are opened
-
Make sure ceiling fans are off
-
Make sure toilets lids are down
-
Make sure closet doors are closed
-
Straighten up the chairs, pillows etc…
-
Hide small items that are a distraction in closets or cabinets
Tip 2- Camera settings
-
.jpeg
-
Wide angle lens 14mm
-
5 exposures -4ev, -2ev, 0ev, +2ev, +4ev.
-
ISO under 400
-
Aperture f/8
-
Auto white balance
-
Lens focus from minimum to infinity


Tip 3- Tripod height
-
Interior and backyard tripod height 42 inch
-
Kitchen and front tripod height 48 inch

Tip 4- Adjust the polarizer to minimize the glare on the FLOOR


Tip 5- Get familiar with the house
-
Identify INVISIBLE walls and shoot each room


Tip 6- How to take interior pictures? part 1
-
Show 2 full walls and a LITTLE of the 3rd wall


Tip 7- How to take interior pictures? part 2
-
Show full items on the SIDES of the frame


Tip 8- How to take interior pictures? part 3
-
Apply the 4 wall system to every room


Tip 9- How to take exterior pictures? part 1
-
Cover the sun


Tip 10- How to take exterior pictures? part 2
-
Homes sitting on a lot higher than the street
.jpg)
.jpg)
.jpg)
.jpg)
-
Homes that have a fence in the front blocking the house
.jpg)
.jpg)
Tip 11- How to take exterior pictures? part 3
-
Condo in a big building


-
Condo in a small building (capture the front with an angel showing the unit and the walkways, capture the front yard, IMPORTANT capture the garage in the back)
.jpg)
.jpg)
.jpg)
.jpg)
.jpg)
.jpg)
Tip 12- How to take drone pictures?
Tip 13- Don't miss the highlights of the property

Recommended photos
Front of the House:
Distance: As far back as possible without showing too much street.
-
Left Angle: From the left side of the house.
-
Straight-On: Directly facing the front of the house.
-
Right Angle: From the right side of the house.
.jpg)
.jpg)
.jpg)
Close-Up of Front:
-
One photo focusing on the pathway to the front door, including landscaping or front porch. This does not need to show the entire house.
.jpg)
Entryway:
-
One photo looking into the house from the front door.
-
One photo looking toward the front door.
.jpg)
.jpg)
Living Room:
-
One photo from an angle as you enter the room.
-
One photo from an angle that faces the furniture.
-
One photo from a third corner you feel provides a better view than the fourth corner.
.jpg)
.jpg)
.jpg)
Dining Room:
-
One photo from an angle as you enter the room.
-
One photo from the opposite direction.
.jpg)
.jpg)
Kitchen:
-
1st corner.
-
2nd corner.
-
3rd corner.
-
4th corner
-
One photo for close-up details if the kitchen has upgrades or special features.
.jpg)
.jpg)
.jpg)
.jpg)
.jpg)
Family Room:
-
One photo from an angle as you enter the room.
-
One photo from an angle that faces the furniture.
-
One photo from a third corner you feel provides a better view than the fourth corner.
.jpg)
.jpg)
.jpg)
Staircase:
-
One photo from the 1st floor.
-
One photo from the 2nd floor.
.jpg)
.jpg)
Office/Loft:
-
One photo from an angle as you enter the room.
-
One photo from the opposite direction.
.jpg)
.jpg)
Master Bedroom:
-
One photo from the corner closest to the entry.
-
One photo from the opposite corner.
-
One photo from the corner that shows the pathway to the master bathroom.
.jpg)
.jpg)
.jpg)
Bedrooms:
-
One photo from the corner closest to the entry.
-
One photo from the opposite direction.
.jpg)
.jpg)
Bathrooms:
-
One or two photos per bathroom. Take two if the entire bathroom can’t be captured in one shot.
.jpg)
.jpg)
.jpg)
Laundry Room:
-
One photo.
.jpg)
Hallway:
-
One photo.
.jpg)
.jpg)
.jpg)
.jpg)
.jpg)
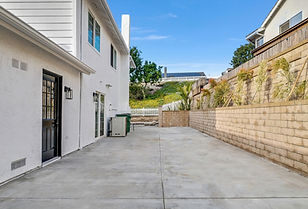
Back Yard:
-
1st corner.
-
2nd corner.
-
3rd corner.
-
4th corner
-
Additional photos for each amenity (such as pool, spa, outdoor kitchen, fire pit, seating area, side yard, RV parking).
.jpg)
.jpg)
.jpg)
.jpg)
.jpg)
.jpg)
.jpg)
Balcony:
-
Two corner photos to capture the view.
.jpg)
.jpg)
Drone Photos:
-
Low Altitude (10 feet): One or two photos. Choose the best angles.
-
Overhead: One photo looking down at the house to show the entire lot.
-
High Altitude (75-100 feet): One or two photos from the front (angle or straight-on).
-
High Altitude (75-100 feet): One or two photos from the back (angle or straight-on),
-
Community View: One high and distant photo to show the community.
-
Additional Drone Shots: Feel free to add more, especially for houses with beach, lake, mountain, or nice views.
.jpg)
.jpg)
.jpg)
.jpg)
.jpg)
.jpg)